


Glass Railing Hardware: Components, Grades & Code
A glass railing can look nearly weightless, but its safety depends on precise connections beneath and around every panel. The right components support the glass, transfer loads into the deck or stair structure, and help the finished system meet California requirements for height, spacing, and glazing.
Request a glass railing estimate
Glass railing hardware includes base shoes, standoffs, clamps, brackets, and stainless steel fittings that secure railing panels to a supporting surface. A safe selection depends on the mounting surface, panel specification, climate exposure, and current California requirements.
Understanding what each fitting does makes it easier to compare designs and identify where structural performance matters more than appearance. Start with the hardware family itself, then evaluate how each component supports the glass in a real installation.
What Is Glass Railing Hardware?
Glass railing hardware includes base shoes, standoffs, clamps, brackets, and related stainless steel fittings that secure railing panels to a supporting surface. For a typical residential installation, 12mm tempered safety glass works with properly selected hardware to create a durable guard. The best choice depends on the mounting surface, layout, exposure to coastal air or pool chemicals, and applicable code requirements.
Glass railing hardware is the collection of structural components that anchors, joins, and supports glass panels so they function as one guard system. The hardware connects the railing to a deck, stair, balcony, or other mounting surface, then holds each panel in the intended position. Depending on the design, that connection may be made through a continuous base shoe, individual standoffs, clamps, or another engineered fitting.
These parts do more than create a finished appearance. They transfer the forces placed on the guard into the supporting structure while keeping the panels aligned. The mounting surface, the layout, the glass specification, and the selected hardware all need to work together. Choosing a component because it looks clean or minimal, without confirming how it anchors and carries load, can compromise the entire installation.
Most residential systems use 12mm tempered safety glass. Tempering heat-treats the glass to significantly increase its strength compared with standard annealed glass. The panel still depends on properly selected hardware, however. Gaskets and spacers should separate the glass from metal fittings, and fasteners must be appropriate for the mounting surface. This is why safety is the primary consideration when specifying tempered glass and code-compliant hardware.
Common hardware families include:
- Base shoes: Continuous channels that conceal the lower edge of the panel and provide a clean, seamless appearance while supporting the glass.
- Standoffs: Spacers that anchor panels from the side of a deck or stair, creating a modern, frameless look.
- Clamps: Fittings that connect glass panels to posts or other supports in a range of residential configurations.
- Top rails and finishing pieces: Components that can add stability and a defined upper edge where the design calls for them.
The right choice depends on the mounting condition and the visual goal. A base shoe may suit a clean perimeter installation, while standoffs can work well where preserving the edge profile matters. For a broader overview of glass railing system hardware, review how these components fit into a complete system before selecting individual parts.
In California, hardware selection and installation must support applicable safety, height, spacing, and glazing requirements. A professional installer can verify the structure, align the fittings accurately, and specify a system that supports both the design and safety performance expected of a residential guard.
What Glass Railing Hardware Components Do You Need?
A complete glass railing hardware package may include a base shoe or standoffs, clamps or spigots, top caps, gaskets, spacers, anchors, and fasteners. The right combination depends on whether the system is top-mounted, side-mounted, post-supported, or point-supported, plus the glass thickness and mounting surface.
The right component depends on two practical questions: what look you want and where the railing can be anchored. A deck edge, stair stringer, concrete slab, and framed balcony may each call for a different glass railing hardware configuration. Stainless steel base shoes, standoffs, clamps, and related fittings support and anchor the panels, while gaskets and spacers help prevent direct glass-to-metal contact that could cause cracking.
Base shoes for a clean, continuous line
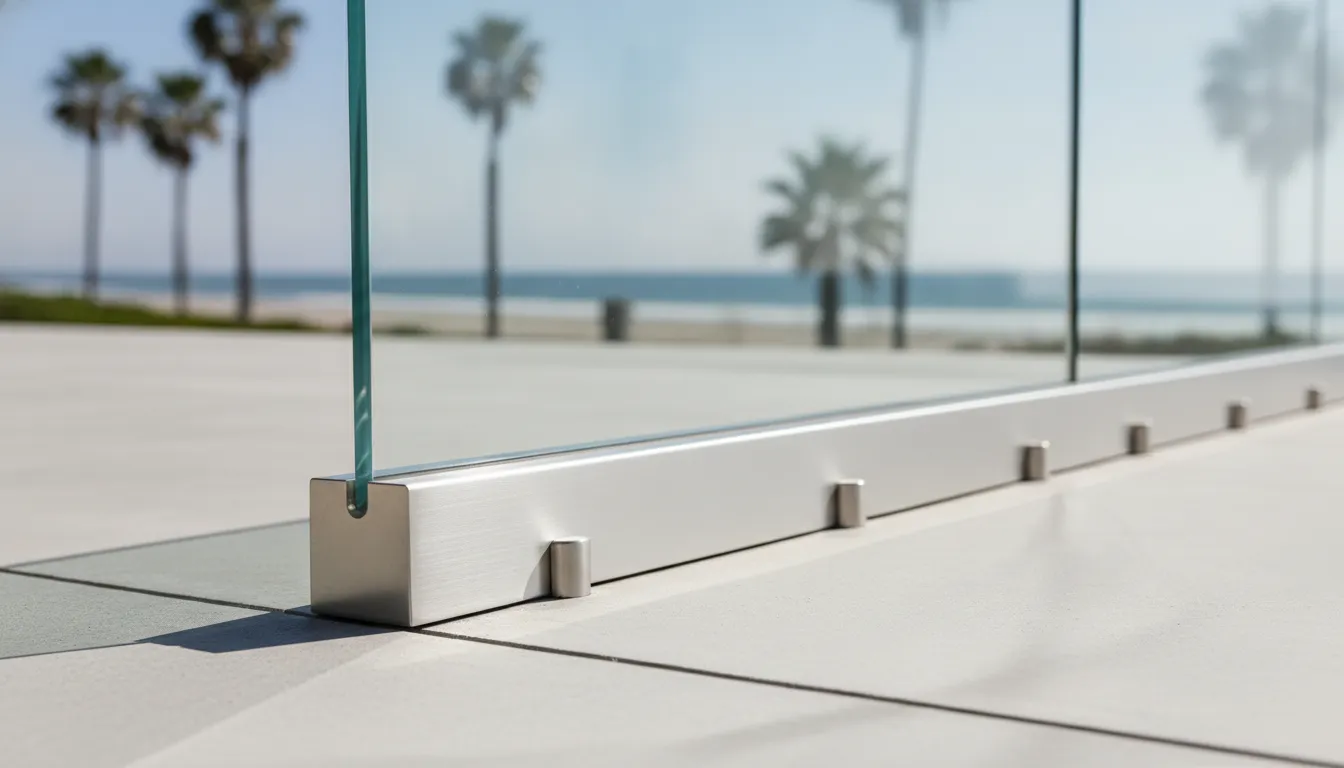
A base shoe is a channel that holds the bottom edge of the glass panel. Because the shoe conceals much of the lower connection, it creates a seamless appearance with fewer visible fittings. It is often a strong choice along a deck, balcony, or concrete surface where the installer can create a continuous, properly anchored run. Choose this style when you want broad, unobstructed glass with a substantial base detail rather than individual point connections. For deck-specific design context, see our glass deck railing guide.
Standoffs and pins for a minimalist side mount
Standoff, or stand-off pin, systems attach the glass at separate points instead of holding it in a continuous channel. The result is a modern, frameless look that works especially well when panels mount to the side of a deck or stair. Standoffs can also preserve more of the view near the walking surface. Their placement and anchoring must match the structure, not just the visual design, because each connection transfers forces into the mounting surface.
Clamps, spigots, and surface-mounted fittings
Glass clamps connect panels to posts or other supporting members. They are a practical option for residential layouts that use posts and make sense when the existing structure is better suited to discrete connections than a full base shoe. Glass spigots support panels from below, commonly for a poolside glass fence or open-deck appearance. They keep the glass visually light while providing point-supported attachment at the surface.
Edge, fascia, and glass-to-glass connections
Edge-mount systems attach hardware at the side edge of a slab, deck, or stair. Fascia-mount systems do the same along the vertical face of a structure, which can preserve usable deck space and create a cleaner top surface. These choices are useful when a top-mounted base shoe would interfere with drainage, trim, or foot traffic.
Glass-to-glass clips join adjacent panels at a corner or change in direction. Articulating clips allow the connection angle to adjust, making them useful for stairs, landings, and other non-linear layouts. A D clip is a compact point fitting for securing glass to a post or support. These small parts still need compatible gaskets and accurate alignment to avoid concentrated stress in the glass.
Top caps and rails for a finished edge
A top cap or top rail covers the upper edge of the panel. Some homeowners prefer the uninterrupted look of bare glass, while others choose a rail for a defined handhold, a finished architectural line, or additional stability. The best selection balances the desired profile with the mounting surface, panel layout, and applicable safety requirements. For a broader overview, see this guide to durable glass railing system hardware.
Which Stainless Steel Grade Suits Glass Railing Hardware?
Grade 304 stainless steel is often suitable indoors or in protected exterior areas. Grade 316 offers greater resistance to chloride exposure and is generally better for coastal homes, pool decks, and exposed balconies. The grade should be selected with the anchors, fasteners, mounting surface, and maintenance plan.
Stainless steel is the standard material for glass railing hardware because it combines strength, a clean appearance, and resistance to everyday moisture. Unlike finishes that can peel or fade, properly selected stainless steel is designed for demanding outdoor conditions, including sun, rain, and seasonal temperature changes. It also helps the hardware maintain a consistent appearance over time.
The grade matters, especially when a railing is exposed to salt air or pool chemicals. Both 304 and 316 are durable stainless steel options, but 316 includes improved resistance to chloride exposure. That makes it the stronger choice for many Southern California coastal homes and poolside installations. Grade selection should be considered alongside the mounting surface, glass specification, fasteners, and the project’s overall exposure.
| Consideration | 304 stainless steel | 316 stainless steel |
|---|---|---|
| Corrosion resistance | Strong resistance for typical interior and standard exterior conditions. | Improved chloride resistance for harsher moisture and salt-air exposure. |
| Best use | Interior railings, covered areas, and standard exterior applications. | Coastal homes, pool decks, exposed balconies, and other demanding exterior settings. |
| Coastal or pool suitability | May be suitable when exposure is limited and maintenance is consistent. | Generally recommended where salt air, chlorine, or frequent moisture is present. |
| Cost | Usually the more budget-conscious grade. | Typically costs more, but can provide better protection in harsh environments. |
For an indoor stairway or a protected patio, 304 can provide a sensible balance of appearance, performance, and cost. For a railing near the ocean, around a swimming pool, or on an exposed upper-level deck, 316 is usually the better long-term investment. The added corrosion resistance is particularly valuable because chloride exposure can be persistent even when the hardware looks clean at installation.
Grade 316 is not a substitute for good installation or maintenance. Hardware should be aligned correctly, paired with the right anchors, and installed with components that suit the glass system. Regular cleaning is also important in coastal and pool environments. A contractor can help match the stainless steel grade to the home’s exposure instead of treating every project as if it has the same conditions.
What Code Requirements Affect Glass Railing Hardware?
California code affects the finished guard height, glazing, spacing, and structural load path. Hardware must secure the specified glass to a sound substrate and work as part of the complete guard. A professional installer should confirm the current requirements for the property’s use, location, and design before installation.
In California, a glass railing is a safety guard first and a design feature second. The California Building Code (CBC), Title 24, Part 2, sets requirements for guard height, panel glazing, and the way supporting hardware transfers force into the structure. A slim profile or nearly invisible bracket is a good choice only when it also performs as part of a compliant system.
Guard height and panel design
For decks and balconies, guards must be at least 42 inches high under CBC Section 1015.3. The measurement applies to the completed guard, so the glass panel, base shoe or standoff, and finished mounting arrangement need to be considered together. A hardware layout that looks appropriate in a product photo may not provide the required finished height once installed on a sloped deck, stair, or raised surface.
The code also addresses glazing. Glass used as a guard must comply with Section 2407, which covers glass and glazing in guards and handrails. The California Division of the State Architect discusses glass panel railings in DSA Interpretation IR 24-1. For homeowners, the practical takeaway is straightforward: specify safety glazing appropriate for the railing system, rather than treating ordinary architectural glass as interchangeable with railing glass. A typical installation uses 12mm tempered safety glass, but the final glass and support specification should be confirmed for the project.
Loads must reach the structure
Guardrails are designed to resist people leaning or falling against them, along with other forces identified by the applicable code. The California Building Code therefore requires the railing design to account for load requirements. Hardware is not merely decorative trim. A base shoe, clamp, standoff, or top rail must be selected for the glass system and attached to a sound mounting surface with the appropriate anchors and fasteners.
This is why mounting surface matters as much as appearance. A side-mounted standoff on a properly reinforced deck edge transfers force differently than a base shoe anchored to concrete. The support must be aligned and secure, while gaskets or spacers keep the glass from contacting metal directly. A professional glass railing installer helps prevent stress concentrations in the glass and verifies that the selected glass railing hardware works with the structure, panel specification, and site conditions.
Before approving a hardware finish or minimalist detail, ask how the complete assembly meets the CBC height, glazing, spacing, and load requirements. In Southern California, that code-based review is what turns a beautiful glass railing concept into a safe, durable installation.
What Should You Check on a Glass Railing Hardware List?
Check the glass specification, stainless steel grade, mounting substrate, anchors, gaskets, spacers, fasteners, and final alignment. Every part should be compatible with the others. Reviewing the list before ordering helps catch missing separators, unsuitable anchors, and hardware that does not match the glass thickness or site exposure.
Before installation begins, review every component as part of one system. A strong glass panel does not compensate for an unsuitable anchor, an incompatible gasket, or a mounting surface that cannot carry the design loads. This checklist gives homeowners and project teams a practical way to confirm the basics before hardware is ordered or fastened in place.
- Confirm the glass specification. Verify that the panels are specified as 12mm tempered safety glass, the standard used for secure glass railing installations. The glass should be appropriate for the selected hardware and intended application. Ask for the product specification rather than relying on a general description such as safety glass. Proper hardware installation also supports compliance with residential safety glazing requirements. See this glass railing guide for costs, safety, and design before approving the final material schedule.
- Choose the finish and stainless steel grade. Stainless steel is the standard material for glass railing hardware because it provides durability and corrosion resistance. For coastal properties, pool decks, or other chloride-heavy environments, confirm whether 316-grade stainless steel is the appropriate choice. A finish should complement the surrounding architecture, but appearance should not replace a specification suited to the exposure conditions.
- Match anchors to the mounting surface. Identify whether the system will attach to a concrete deck, wood framing, steel structure, stair stringer, side wall, or fascia. Then verify that the anchors and base hardware are designed for that surface and for the loads required by the project. Do not assume that a fastener suitable for one substrate will perform the same way in another.
- Inspect the mounting surface before drilling. The substrate must be sound, stable, and prepared for accurate anchor placement. Check the edge distances, reinforcement conflicts, surface condition, and available framing. Hardware selection depends heavily on the mounting surface, and a precise layout is easier to achieve when these conditions are documented before installation.
- Verify gaskets and spacers. Every contact point between the glass and metal hardware should use the specified gasket, isolator, or spacer. These components prevent direct glass-to-metal contact, which can create pressure points and contribute to cracking. Confirm that they match the glass thickness and are seated correctly rather than pinched, missing, or substituted with improvised material.
- Check fasteners and connection details. Review the fastener type, size, material, embedment, and tightening requirements for each connection. Fasteners should secure the hardware without distorting it or transferring unnecessary stress into the glass. Keep the installation documentation available so the installer can confirm each connection instead of relying on visual appearance alone.
- Measure leveling and alignment before final tightening. Panels, posts, base shoes, standoffs, and clamps should be checked for plumb, level, consistent spacing, and a clean sightline. Precision alignment protects the glass from concentrated stress and improves the finished appearance. Professional installation is especially valuable at this stage because small layout errors can affect both structural integrity and the uniform look of the completed railing.
How Do You Choose Hardware for Your Climate?
Choose glass railing hardware based on moisture, salt air, pool chemicals, and daily use. Grade 316 stainless steel is generally preferred for coastal and poolside settings, while grade 304 can suit lower-exposure locations. Cleaning and inspection also matter because corrosion, loose fittings, and damaged gaskets can affect long-term performance.
The best glass railing hardware is not selected by appearance alone. Start with the environment around the railing, the mounting surface, and the way the space will be used. A coastal balcony, an inland staircase, and a pool deck can require different finishes, fasteners, and maintenance routines even when they share the same clean glass design.
For homes near the ocean or beside a pool, grade 316 stainless steel is generally the stronger choice because it offers improved resistance to chloride exposure. Salt air and chlorine residue can accelerate corrosion on less suitable metals and finishes. Grade 304 may be appropriate for interior applications or a standard exterior location with lower exposure. Your installer should evaluate the site rather than treat every project the same. Stainless steel also remains stable through seasonal temperature changes, which helps the system perform consistently outdoors.
Poolside use calls for a more active cleaning schedule. Clean the glass and hardware monthly to remove chlorine residue before it builds up on the surfaces. Elsewhere, quarterly cleaning is a practical baseline. Regular care preserves the clarity of the panels and helps protect the long-term reliability of the complete installation. If the railing is exposed to salt spray, windblown debris, or heavy household use, inspect it more often.
During periodic inspections, look for loose fasteners, movement at the posts or base shoe, damaged gaskets, and any hardware that appears discolored or pitted. Gaskets and spacers should keep the glass from touching metal directly. A damaged or missing separator deserves prompt attention because direct glass-to-metal contact can create stress and increase the risk of cracking. Do not attempt to compensate for movement by tightening random fittings. The correct repair depends on the mounting surface and the system design.
Hardware selection also affects the project budget. Base shoes, standoffs, clamps, and custom mounting solutions carry different material and installation requirements. Review the expected glass railing cost per linear foot with the hardware specification included, rather than comparing a bare glass price with a complete installed system. For a closer look at glass railing hardware selection, consider how the finish, mounting method, and visual goals work together.
Finally, professional installation is part of choosing durable hardware. Precise leveling and alignment help prevent uneven loading and stress concentrations in the glass.
An experienced installer can verify the mounting surface, select appropriate anchors, install the correct gaskets, and confirm that the completed guard meets applicable safety requirements. This attention to detail gives the glass railing its intended appearance while supporting reliable performance for years to come.
Request a glass railing estimate
Frequently Asked Questions
How do you hold a glass railing in place?
Glass panels are secured with hardware matched to the mounting surface and design. A base shoe supports the panel along its bottom edge, while standoffs anchor it to a deck or stair side. Clamps connect panels to posts, and top rails can add finished support. Gaskets and spacers must separate the glass from metal to help prevent cracking, while precise alignment limits stress concentrations.
What type of hardware is best for a coastal or poolside railing?
316-grade stainless steel is generally the better choice for coastal and poolside installations because it offers improved resistance to chloride exposure. Stainless steel remains durable through outdoor moisture and seasonal temperature changes, but the system still needs regular cleaning. In pool areas, monthly cleaning helps remove chlorine residue before it builds up on the glass and hardware.
How expensive is a glass railing with hardware?
Glass railing projects typically range from $70 to $225 per linear foot, depending on the glass, hardware, mounting conditions, layout, and installation complexity. A project estimate should account for the hardware appropriate to the site rather than treating every bracket, clamp, or base shoe as interchangeable. For a broader breakdown, see our glass railing cost guide. Source: glass railing cost data.
What glass railing code requirements affect hardware?
In California, the complete guard system must meet applicable requirements for height, loads, spacing, and safety glazing. California Building Code Title 24, Part 2, Section 1015.3 specifies a 42-inch minimum guard height in the cited application, and glass or glazing must comply with Section 2407. Hardware, anchors, and mounting surfaces must be selected and installed as part of that engineered system. Source: California DSA glass panel railing guidance.
Get Help Choosing Glass Railing Hardware
Choosing the right glass railing hardware is about more than looks. It is about matching stainless steel grades, mounting systems, and fasteners to your home, your climate, and the requirements of the California Building Code. Get it right and your railing stays secure for decades with minimal upkeep.
With more than 35 years of experience installing glass and aluminum railing systems across Southern California, A G Vinyl Fencing helps homeowners select hardware that is safe, code-compliant, and built to last. Each project is evaluated for the correct hardware, mounting surface, and site conditions.
Tell us about your deck or balcony and our team can walk you through the components that fit your space.
Discuss your glass railing hardware project
Gary Andreasyan is at the forefront of A G Vinyl Fencing, setting the standard for high-quality fencing solutions. His expertise in vinyl fencing has positioned the company as a go-to for durable, low-maintenance fencing options that enhance property value and security. Gary’s commitment to customer satisfaction and innovative fencing solutions drives A G Vinyl Fencing’s success, providing clients with a range of styles and designs that meet their specific needs and preferences.


0 Comments